
快速上手
模块初览
 在 concent 里,提供一个全局唯一的
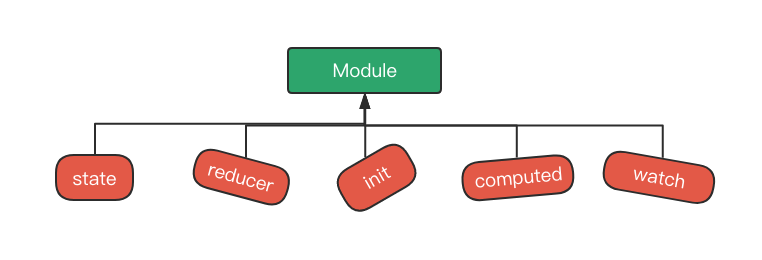
store,而store是由多个模块一起组成的,模块是一个非常重要的概念,每个模块又分别由state、reducer、computed、watch、init组成。
除了 state 是必需的,其他都是可选项,按需配置就好
state定义模块下的数据。reducer定义模块修改数据的业务逻辑,因为对于 concent 来说,setState就可以修改模块的数据,所以reducer不是必需的,对于简单的业务逻辑你可以直接使用setState来完成数据修改,但是通常项目的功能会越来越复杂,而修改数据前的处理过程代码就对应着我们的业务逻辑,这时候为了解耦业务逻辑与 ui 渲染,建议将其抽离到reducer,了解更多关于 reducer。computed定义各个stateKey的值发生变化时,要触发的计算函数,并将其结果缓存起来,仅当stateKey的值再次变化时,才会触发计算,了解更多关于 computed。watch定义各个stateKey的值发生变化时,要触发的回调函数,仅当stateKey的值再次变化时,才会触发,通常用于一些异步的任务处理,了解更多关于 watch。init可以对state完成一次异步的初始化过程,如果模块的state是需要异步的被赋值的时候,可以对其定义init函数,返回的状态将被合并到state里,如果此时此模块下已经实例化了一些组件,init 返回的状态也会被分发到各个实例上,了解更多关于 init。
对于仅有一定 react 基础的用户,可以快速浏览以下内容,以便第一时间上手 concent,而对于使用过 redux,mobx 等状态管理框架的用户,可以查看左侧教程&实战了解更多相关的内容,强烈推荐到 stackblitz、codesandbox 等在线 IDE 上编写代码以加深对 api 的理解
stackblitz:一个相对复杂的例子
codesandbox:一个相对简单的例子
创建 store 子模块
声明一个模块foo,只包含state定义
// codeconst foo = {
  state: {
    name: 'concent',
    firstName: '',
    lastName: '',
    age: 0,
    hobbies: [],
  },
};
载入模块,启动 concent
使用 concent 提供的run接口,配置模块启动 concent。
import { run } from 'concent';

run({ foo });
注册组件
书写一个 class 组件,使用使用 concent 提供的register接口,将其注册为 concent 组件,指定其属于foo模块。
import React, { Component } from 'react';
import { register } from 'concent';

@register('foo')
class HelloConcent extends Component {
  state = { name: 'this value will been overwrite by foo module state' };  render() {
    const { name, age, hobbies } = this.state;
    return (
      <div>
        name: {name}
        age: {age}
        hobbies:{' '}
        {hobbies.map((v, idx) => (
          <span key={idx}>{v}</span>
        ))}
      </div>
    );
  }
}
指定组件属于 foo 模块后,concent 会在组件初次渲染前将其所属模块的state合并到实例的this.state上,实例state里声明了和模块state同名的 key 的话,其值将会被覆盖,所以上面的示例里state = { name: 'this value will been overwrite by foo module state' },其 name 值在 render 最终将是模块state里初始值concent;
当然,你可以声明额外的 key 在实例上,不同于模块 state 的 key,这些 key 的值对于实例来说就是私有的,改变它们的值,不会影响到其他实例。
添加修改数据行为
加入一个输入框,修改名称
为了不干扰演示,下面的示例将类里的多余的 state 声明去掉。
@register('foo')
class HelloConcent extends Component {
  changeName = (e) => {
    this.setState({ name: e.currentTarget.value });  };
  render() {
    const { name, age, hobbies } = this.state;
    return (
      <div>
        name: <input value={name} onChange={this.changeName} />
        age: {age}
        hobbies:{' '}
        {hobbies.map((v, idx) => (
          <span key={idx}>{v}</span>
        ))}
      </div>
    );
  }
}
实例化组件
一切工作准备就绪,我们渲染多个HelloConcent看看效果吧。
import ReactDOM from 'react-dom';

function App() {
  return (
    <div>
      <HelloConcent />
      <HelloConcent />
    </div>
  );
}
ReactDOM.render(<App />, document.getElementById('root'));
指定 key 的观察范围
上面的例子里,我们直接使用setState修改数据从未触发 ui 渲染,当我们实例化多个HelloConcent后,其中任意一个实例修改了name值,其他实例都将会被触发渲染,因为我们注册组件时,只指定了模块,没有指定观察 key 列表,此时 concent 将默认该组件关心foo模块状态的所有 key 变化,如果我们创建了一个新的组件FooComp,也属于foo模块,但是不想因为某个HelloConcent调用this.setState({name:...})时也触发FooComp的渲染,我们需要在注册FooComp时标记watchedKeys来排除影响。
@register({ module: 'foo', watchedKeys: ['age'] })class FooComp extends Component {
  render() {
    const { name, age, hobbies } = this.state;
  }
}this.state 依然能取到 name 与 hobbies,但是因为标记了 watchedKeys 为['age'],所以他们永远是旧值,如果组件渲染里需要用到 name,hobbies 参与渲染,那么就不该限定 FooComp 的 watchedKeys,或者标记 watchedKeys='*',表示观察 foo 模块所有 key 的值变化,如果渲染里并不需要用到 name,hobbies,但是组件的业务逻辑(比如提交表单)需要用到他们,可以通过 concent 提供的顶层 api 来获取最新的值。
import { getState } from 'concent';

@register({ module: 'foo', watchedKeys: ['age'] })
class FooComp extends Component {
  submit() {
    //这个值才是最新的
    const { name, hobbies } = getState('foo');  }
}
定义 reducer
当我们提交变更数据前有不少的处理过程的时候,组件的代码会越来越臃肿,为了解耦业务逻辑也 ui 渲染,我们需要合理的剥离相关处理过程过程到reducer。
在 concent 里,触发reducer特别简单,因为 concent 为每一个组件实例都构建了一个实例上线文对象ctx,该对象上提供了 concent 为组件能力增强的 api,你可以用this.ctx.dispatch('reducerFnName', payload)直接呼叫 reducer 函数,从而避免各种map***ToProps和相关的配套action定义。
- reducer 函数可以是纯函数,可以是
async函数,也可以是生成器函数 - 可以返回一个部分状态,可以调用其他
reducer函数后再返回一个部分状态,也可以啥都不返回,只是组合其他reducer函数来调用。
const foo = {
  state: { ... },
  reducer: {
    changeName(name) {
      return { name };
    },
    async changeNameAsync(name) {
      await api.track(name);
      return { name };
    },
    async changeNameCompose(name, moduleState, actionCtx) {
      await actionCtx.setState({ loading: true });
      await actionCtx.dispatch('changeNameAsync', name);
      return { loading: false };
    }
  }
}
建议的做法是将 reducer 函数独立放一个文件,在暴露出来给 module 配置,这样的 reducer 里函数间的相互调用可以不用基于字符串了,同时因为 concent 的 module 是包含多个可选定义项的,分离它们有利于后期维护和扩展。
├── modules
    ├── foo
        ├── state.js
        ├── reducer.js
        ├── computed.js
        ├── watch.js
        ├── init.js
        ├── index.js
    ├── bar
        ├── ...
此时 reducer 文件里,调用可以基于函数引用了
// code in models/foo/reducer.js
export function changeName(name) {
  return { name };
}

export async function changeNameAsync(name) {
  await api.track(name);
  return { name };
}

export async function changeNameCompose(name, moduleState, actionCtx) {
  await actionCtx.setState({ loading: true });
  await actionCtx.dispatch(changeNameAsync, name); //基于函数引用调用
  return { loading: false };
}
在组件里触发 reducer
@register('foo')
class HelloComp extends Component {
  changeName = (e) => {
    // this.setState({name:e.currentTarget.value})

    this.ctx.dispatch('changeName', e.currentTarget.value);
    // or this.ctx.dispatch('changeNameAsync', e.currentTarget.value);
    // or this.ctx.dispatch('changeNameCompose', e.currentTarget.value);
  };
}
定义模块 computed
concent 正确的修改数据行为是提交片段 state,即变化了数据就提交什么,这与 react 的setState是一致的理念,真因为如此,concent 可以精确的感知到哪些 key 的值发生了变化,所以允许你定义计算函数,concent 会将其返回结果缓存起来。
了解更多关于 computed
// code in models/foo/computed.js

//当age发生变化时,对age做计算,
export function age(newVal, oldVal) {
  return newVal * 2;
}
//因为依赖key只有一个且和计算结果key同名,就可以像上面这样写
//等同于写为 export const age = {fn:..., depKeys:['age']}

//对firstName, lastName任意一个值发生变化时,计算新的fullName
export const fullName = {
  fn(newState, oldState, fnCtx) {
    // fnCtx.setted查看提交的状态key列表
    // fnCtx.changed查看提交的状态key列表里发生了变化的key列表
    // fnCtx.retKey查看当前函数的计算结果对应key,当前示例为 fullName
    return `${newState.firstName}_${newState.lastName}`;
  },
  depKeys: ['firstName', 'lastName'], //这里定义触发fullName计算的依赖key列表};
获取模块 computed 计算结果
@register('foo')
class HelloComp extends Component {
  render() {
    const { age, fullName } = this.ctx.moduleComputed;  }
}模块 computed 的初次计算在启动 concent 载入模块时就被触发了初次计算,和该模块下有没有相关的组件被实例化没有关系。
key 对应的应该是 primitive 类型的(如 number, string, boolean),如果是 object 型,则需要总是返回新的引用才能触发计算,或者设置 compare 为 false,只要对这个 key 设了值就触发计算
// code in models/foo/computed.js

//hobbies是一个数组
export function hobbies(hobbies, oldVal) {
  return hobbies.length * 2;
}

// code in models/foo/reducer.js
export function addHobby(hobby, moduleState) {
  const { hobbies } = moduleState;
  hobbies.push(hobby);
  // return { hobbies };不会触发hobbies的计算函数
return { hobbies: [...hobbies] }; //正确的写法}如果需要return { hobbies }能触发计算,则定义 hobbies 计算函数时,需要将其compare指定为false,表示只要设了hobbies的值,就触发计算
export const hobbies = {
  fn: (hobbies) => hobbies.length * 2,
compare: false, //不做比较,只要片段状态里对设了`hobbies`的值,就触发计算};当然,你可以打开console,输入cc.setState('foo', {age:100})或cc.set('foo/age', 100)去修改foo模块的 age 值从而触发age再次被计算,此命令也同时会触发所有相关组件被渲染。
定义模块 watch
同 computed 一样,可以对 key 做一些 watch 定义,当 key 的值发生改变时触发其 watch 回调,适用于一些需要处理异步任务的场景。
// code in models/foo/watch.js

//当age发生变化时触发此函数
export function age(newVal, oldVal) {
  api.track('ageChanged');
}

//对firstName, lastName任意一个值发生变化时,触发此函数
export const fullName = {
  fn(newState, oldState, fnCtx) {
    // fnCtx.changed查看提交的状态key列表里发生了变化的key列表
    const { changed } = fnCtx;
    if (changed.includes('firstName')) api.track('firstNameChanged');
    if (changed.includes('lastName')) api.track('lastNameChanged');
  },
  depKeys: ['firstName', 'lastName'], //这里定义触发fullName watch回调的依赖key列表
};
定义模块 init
当模块的状态需要异步的被初始化的时候,就可以定义 init 函数,注意,模块state还是需要被定义的,只不过里面全是空值,真正的值由init函数的返回结果来填充,可以等价为组件constructor里定义了一次 state,然后在componentDidMount阶段再次获取新的state值。
只不过模块state的初始化和组件是否实例化没有关系,如果此时此模块下已经实例化了一些组件,init 返回的状态也会同时被分发到各个实例上。
// code in models/foo/init.js
export default async () => {
  const data = api.getData();
  //处理data
  return data;
};
跨多个模块的组件
上述的示例中,注册的组件都指定了属于foo模块,所以实例上线文对象调用this.ctx.dispatch('reducerFnName', payload)时,知道触发的是foo模块的reducer函数修改foo模块的数据。
this.ctx.dispatch('changeName', 'newName');
//等同于写为
this.ctx.dispatch('foo/changeName', 'newName');

//如果我们要显示的去触发其他模块的reducer函数,可以写为
this.ctx.dispatch('bar/changeName', 'newName');如果我们的组件还要消费其他模块的数据,则需要注册是定义connect来连接其他模块,以便达到消费其他模块数据的目的。
属于和连接是两个不同的概念,组件 dispatch 行为在没有指定目标模块时,都自动的修改的是自己模块数据,同时数据是诸如到 this.state 里的,而且一个组件只能属于一个模块,但是可以连接多个其他模块,连击的模块其数据是注入到 this.ctx.connectedState.{moduleName}下的
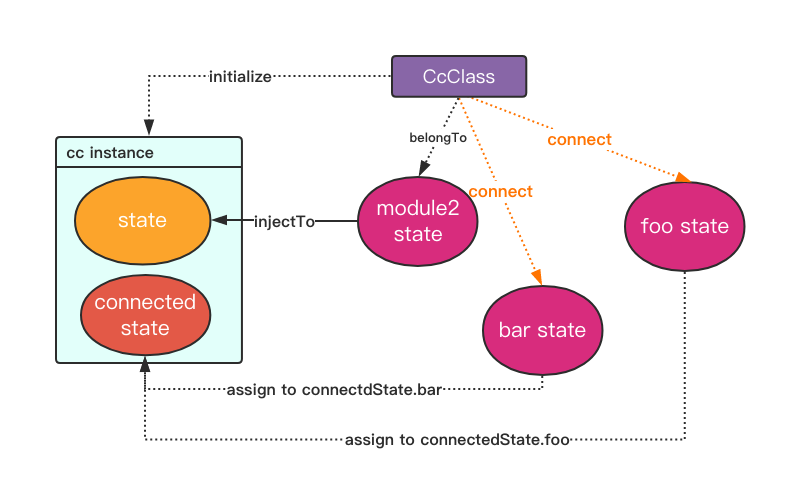
如下我们将定义一个BarComp,指定其属于bar模块,同时连接foo和baz模块,观察foo和baz模块下所有 key 变化
@register({ module: 'bar', connect: ['foo', 'baz'] })
class BarComp extends Component {
  render() {
    const bazState = this.state;
    //获得连接模块的状态
    const { foo: fooState, bar: bazState } = this.ctx.connectedState;
    //获得连接模块的计算结果
    const { foo: fooCu, baz: bazCu } = this.ctx.connectedComputed;
  }
}@register({ module: 'bar', connect: ['foo', 'baz'] })等同于写为
@register({ module: 'bar', connect: {foo:'*', baz:'*'} })
如果我们只需要挑选foo模块的部分 key 做观察,则可以写为
@register({ module: 'bar', connect: {foo:['key1', 'key2'], baz:'*'} })
当然你也可以不指定属于某个模块,只是单纯的连接其他多个模块
@register({ connect: {foo:['key1', 'key2'], baz:'*'} })
此时组件会被 concent 指定属于内置模块
$$default,这是一个空模块,除非你显式地去重定义该模块相关配置项,在没有对$$default模块重定义前,组件里的this.state和模块state将不再有关联,组件的this.setState也不再能够触发修改模块state的数据,组件自定义的state相当于变成完全私有的了。
定义 setup
setup定义是针对实例的,触发时机是组件构造器函数执行结束后,组件将要首次渲染前,所以只会被执行一次,其返回结果将搜集到this.ctx.settings里,配合上线文对象提供的effectapi,还可以达到在类里消灭生命周期函数的效果
@register('foo')
class HelloComp extends Component {
  $$setup(ctx) {    //$$setup会将ctx传递到参数列表里,和this.ctx是同一个对象

    //第二为参数是依赖key名称列表,填写空表示只在首次渲染结束后触发一次,模拟componentDidMount
    ctx.effect((ctx) => {
      // api.fetchData()
    }, []);

    //不传递第二位参数的话,每一次组件渲染结束后都会触发其执行
    ctx.effect((ctx) => {
      // trigger after every render
    });

    //第二为参数依赖key名称列表指定了name,
    ctx.effect(
      (ctx) => {
        // 首次渲染结束时,触发此副作用函数执行
        // 之后只要name变化,就会在组件渲染结束后触发此副作用函数执行
      },
      ['name']
    );

    //第三位参数immediate默认是true,设置为false
    ctx.effect(
      (ctx) => {
        // 首次渲染结束时,不触发此副作用函数执行
        // 之后只要name变化,就会在组件渲染结束后触发此副作用函数执行
      },
      ['age'],
      false
    );

    //第二为参数依赖key名称列表设定了多个值
    ctx.effect(
      (ctx) => {
        // 首次渲染结束时,不触发此副作用函数执行
        // 之后只要name或者age任意一个发生变化时,会在组件渲染结束后触发此副作用函数执行
      },
      ['age', 'name'],
      false
    );

    const changeName = (e) => ctx.dispatch('changeName', e.currentTarget.value);

    return { changeName };
  }
  render() {
    //可用于绑定在ui上
    const { changeName } = this.ctx.settings;
    return <input value={this.state.name} onChange={changeName} />;
  }
}
定义实例 computed
和模块computed不同,实例computed是针对实例的,每一个实例都会触发自己的计算函数,当你的不同实例需要有不同的计算逻辑的时候,才需要定义实例computed,因为实例computed只能定义一次,结合上面提到的setup,我们可以在setup里完成定义,其计算结果将从this.ctx.refComputed里获得
@register('foo')
class HelloComp extends Component {
  $$setup(ctx) {
    ctx.computed('name', (newName) => {
      return newName
        .split('')
        .reverse()
        .join();
    });

    ctx.computed('fullName', {
      fn: (newState) => {
        return `${newState.firstName}_${newState.lastName}`;
      },
      depKeys: ['firstName', 'lastName'],
    });
  }  render() {
    // 从refComputed里获得计算结果
    const { name: reversedName } = this.ctx.refComputed;
  }
}
定义实例 watch
同样的,我们也可以对实例定义watch,以方便处理一些异步任务,如以下示例,当 type 发生变化时,抓取一次数据
@register('foo')
class HelloComp extends Component {
  $$setup(ctx) {
    ctx.watch('type', (newType) => {
      ctx.dispatch('fetchDataWhileTypeChanged', newType);
    });
  }
  render() {
    //这里用了一个sync语法糖函数,自动将onChange事件里的value值同步到state.type下
    return (
      <select value={this.state.type} onChange={this.ctx.sync('type')}>
        <option value='1'>1</option>
        <option value='2'>2</option>
      </select>
    );
  }
}实例 watch 和实例 effect 执行时机不一样,前者是指组件渲染前触发,后者是指组件渲染后触发
拥抱 hook,定义函数组件
concent 之所以成为渐进式的框架,是因为在类组件里的所有概念,都可以平滑的过度到 hook 函数组件,使用useConcent接口,可以让它们拥有完全一致的 api 调用体验,useConcent返回一个实例上下文对象ctx,和类里的this.ctx无论是数据结构还是使用方式都是一模一样的。
import { register } from 'concent';

@register('foo')
class HelloComp extends Component {
  $$setup(ctx) {
    //call ctx.effect、ctx.computed、ctx.watch etc
  }
  render() {
    const {
      refComputed,
      moduleComputed,
      connectedComputed,
      connectedState,
      state,
      settings,
      dispatch,
      sync,
      // etc ...
    } = ctx;
    // return ui
  }
}

// ----------------------------
import { useConcent } from 'concent';

const setup = (ctx) => {
  //call ctx.effect、ctx.computed、ctx.watch etc
};

function HelloHookComp() {
  const ctx = useConcent({ module: 'foo', setup });
  const {
    refComputed,
    moduleComputed,
    connectedComputed,
    connectedState,
    state,
    settings,
    dispatch,
    sync,
    // etc ...
  } = ctx;
  // return ui
}